Saturday, July 31, 2010
First cuts
No pictures, but as soon as I finished the clean up, lubrication and break in procedures I grabbed a piece of 3/8 inch re-bar and chucked it up. The Smithy came with a 6 inch 3-jaw chuck. 3-jaw chucks are self centering with so-so accuracy but fine for most projects. I turned the a few diameters and made a 60 degree angle on the front. It turned well with a decent finish. For the milling machine, I put on the vise that came with the Smithy which is a 4 inch angle vise. Then I took an aluminum ingot from my casting project, put a 2 1/2 inch face mill on the machine and cut away. I was pleased to get an excellent finish on the ingot with the face mill and decided to try a 1/2 inch end mill. The end mill cut well and I set the vise on a 45 degree angle and cut some v-grooves into the side of the ingot. The only issue I found during this test was that I need to tram the milling head as the milling cutters are cutting on one side of the cutter more than the other. I will need to research the best method to tram the head. I'm not real sure that I have much control over the head itself but if I don't I should be able to tram the vise to the head. Not the ideal way to do it but it will work.
Friday, July 30, 2010
Cleaning
After getting the machine on the stand I spent several hours cleaning as much surface area as I could get at. After cleaning off all of the goop from the external surfaces I pulled the tail stock off, cleaned the ways and deburred the gib to make sure that all of those surfaces were clean and smooth so that there was nothing to cause wear on these surfaces. I followed that process for the table and cross slide, then followed the manual instructions for lubrication. I am currently using a 30w Valvoline but am considering switching to an oil/additive combination for additional protection, although I'm not sure yet. I do run additives in my vehicles...............
After getting everything cleaned up and lubricated I followed the manual recommended break in procedure. To accomplish that I spent a few hours running the machine and I found that it was time well spent to get used to the controls on the machine.
The next step was to clean all of the various accessories that I either already had or the new ones that came with the machine.
Now it's time to try cutting some metal and making a few chips!
Wednesday, July 21, 2010
Smithy Granite 1324 Max
After I had decided to purchase one of the 1324 Granite 3-in-1 machines I called Smithy and they were very good to deal with. I wanted to pay cash for the machine but the purchase price was above the daily limit of my debit card. Smithy set it up to be paid over a 2 day period with no headaches. I was told that the machine would ship the day after the final payment was made which was no big deal. What I didn't think of was that the coming weekend was a holiday and so instead of shipping on Friday, the machine didn't ship until Tuesday and it went downhill from there. Instead of taking 5 days it took 2 weeks for the machine to arrive. Plus (and this is the only gripe I have to date about Smithy) the shipping company was to deliver the machine to a company shipping dock in the town that I live in and then I would pick it up from there. The problem was that the company didn't have a facility in my town. The closest company facility they had was over one hundred miles away and they didn't have a correct phone number to contact me about this. When they finally made contact with me I was out of town working and I made arrangements for the company to deliver it to the yard of another shipping company ,my wife then went to go pick the machine up. That cost extra and was a major pain. But everything arrived in good condition so I looked at it as better late than never.
The machine shipped in one crate, the stand shipped in another and there was a third box that had some extra stuff in it.


My plan was to use my engine hoist to lift the crates out of the bed of the truck. Which is what I did, I just had to modify the hoist to get some extra height out of the hoist. To get that height I welded a new jack mount above the original mount on the hoist.


The crate weighed 978 pounds and not trusting my welds 100% I left the C-Clamp on when I lifted the crate out of the truck bed.

Once off the truck I removed the crate and used the ratchet straps to get the machine ready to set on the stand. But first I had to put the stand together.


 After getting the stand put together and positioning the stand I was ready to set the machine in place. The Granite has 5 lift handles around the base of the machine for lifting and it made it easy to use the ratchet straps to lift the machine in a level position. these handles slide out of the base so they aren't in the way once the machine is moved into position. I used 4 of the lifting handles.
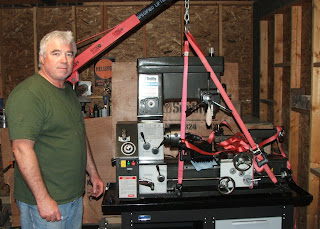 After setting the machine on the stand the next task was to bolt it to the stand. I used 4 grade 8 bolts to take care of that and then broke out an old, very accurate machine level and spent an hour or so making sure I had it as level as I could get it.
After getting it leveled I needed to mount the power supply. I had seen pictures of some mounting locations away from the machine, which would be nice to help keep it clean but I placed the machine so that I have plenty of access all around the machine, so I had to mount it to the machine.
 The standard mounting location is on the back side of the machine, to the right of the bed, below the head stock of the lathe. The supplied four screws take care of it.
After all of that I took some time going over the machine with the manual opened to make sure I knew where everything was located and then I made sure I lubricated the machine thoroughly, as the manual called for with a non-detergent 30w motor oil.
All machines are run in at Smithy, but the manual lays out a run in sequence that doesn't take too long to complete. After the required run in procedure was complete I got to thinking that it may be a good idea to make sure that the machine had been properly cleaned at assembly and I decided to remove the gibs on all of the ways and give them a good cleaning and make sure that the ways were burr free, as I had heard was the case with some people. I found them to be fairly clean and smooth but it was a good step to take. Kind of a cheap insurance and something that I should have done just to be sure before I had run the machine for the first time.
The machine shipped in one crate, the stand shipped in another and there was a third box that had some extra stuff in it.


My plan was to use my engine hoist to lift the crates out of the bed of the truck. Which is what I did, I just had to modify the hoist to get some extra height out of the hoist. To get that height I welded a new jack mount above the original mount on the hoist.


The crate weighed 978 pounds and not trusting my welds 100% I left the C-Clamp on when I lifted the crate out of the truck bed.

Once off the truck I removed the crate and used the ratchet straps to get the machine ready to set on the stand. But first I had to put the stand together.


After getting it leveled I needed to mount the power supply. I had seen pictures of some mounting locations away from the machine, which would be nice to help keep it clean but I placed the machine so that I have plenty of access all around the machine, so I had to mount it to the machine.

After all of that I took some time going over the machine with the manual opened to make sure I knew where everything was located and then I made sure I lubricated the machine thoroughly, as the manual called for with a non-detergent 30w motor oil.
All machines are run in at Smithy, but the manual lays out a run in sequence that doesn't take too long to complete. After the required run in procedure was complete I got to thinking that it may be a good idea to make sure that the machine had been properly cleaned at assembly and I decided to remove the gibs on all of the ways and give them a good cleaning and make sure that the ways were burr free, as I had heard was the case with some people. I found them to be fairly clean and smooth but it was a good step to take. Kind of a cheap insurance and something that I should have done just to be sure before I had run the machine for the first time.
Tuesday, July 20, 2010
I'm back
I have been busy at work and have been moving slowly on my casting activities. Since I last posted I have switched gears a bit and purchased a Smithy 3-in-1 Lathe/Mill/Drill, the Granite 1324 Max. the reason for the purchase has nothing to do with my casting activities but I have come up with several projects that need the larger capabilities of the 1324. having the 1324 WILL make things much easier when I do get around to making the Gingery machines with the foundry, so I figured I was coming out ahead anyway. For those of you that don't know about Smithy, they make a number of 3-in1 machines as well as stand alone Milling Machines and Lathes, both manual and dedicated CNC. From the research I did prior to buying it seemed that all of the reviews I read pointed to the Smithy machines as being the best 3-in-1 on the market. The 1324 has a 13 inch swing on the Lathe with 24 inches between centers which should work for the vast majority of the work I may need to do.The machines are in the light industrial category which will work for me as well. I will add some pictures of the new equipment soon.
I will still be working on the casting projects, I just will be side tracked a bit.
I will still be working on the casting projects, I just will be side tracked a bit.
Monday, February 1, 2010
Crucible
I am thinking about breaking down and purchasing a silicon/carbide or clay/carbide crucible. Budget Casting Supply sells them and it would be the best way to go. Making a crucible out of mild steel pipe or something similar can be done but they don't last as long, are often close to failure as even aluminum gets to pouring temperatures and as I have witnessed can burn through quickly. A potentially dangerous situation.
I figured while I am ordering my Petro Bond, maybe I pop for the better crucible and related tongs, etc.
I figured while I am ordering my Petro Bond, maybe I pop for the better crucible and related tongs, etc.
Friday, January 29, 2010
Winter Activity
After doing some research on my own and getting feedback from some fellow Gingery builders on the "gingery machines" yahoo forum, folks who have quite a bit of experience casting. I have discovered that I can in fact cast and pour metal in the winter and not expect some sort of major disaster or meltdown. So, especially with the weather being so mild in Montana this winter, mid 20's and 30's instead of our average low teens, I will begin casting after getting back from my next work tour. That is so cool! I thought I was done until next spring!
My worry was two fold, one of which is still a concern, but not a dangerous situation. That concern is getting the pour completed without losing so much temperature in the melt that it does not flow well. I am willing to work around that as best as I can. My primary concern was that with the green sand being to cold I ran the risk of some sort of explosive event when the metal met the green sand. Everything I have heard indicates that this is not an issue. In fact one of the forum members is in Alaska and thinks that the frozen green sand may add strength during the casting process. Now, he is using a home made green sand and I will be using Petro Bond, which is uses an oil based binder, while his mixture used water as a binder.
Hopefully in a month or so I will be back with details of my first castings, which should be lathe parts!
Tuesday, December 15, 2009
Second session of melting
Well I didn't get any photos but I did get around to melting some more scrap aluminum. During my first melting session I noted that due to the size of the furnace I had made that it was evident that I needed more heat to get things moving along so I made that adjustment this time around. I started out with a good solid layer of charcoal on the bottom of the furnace four deep and got that burning. While that was getting started, I got some additional charcoal started in my fire pit and set the crucible into place in the furnace to start pre-heating the crucible. Once all of the charcoal was going good I added charcoal around the sides of the crucible about two-thirds of the way up. As soon as I accomplished that task I added scrap to the crucible, set the lid in place and got my air flowing into the furnace.
I checked on the progress after about 20 minutes and found a nice pool of molten aluminum in the bottom of the crucible! At that point I turned off the air, removed the furnace lid and spooned off the slag then added more scrap. Filling the crucible with a bunch of crushed cans the first thing I noticed was that the cans caught fire and melted within no more than 30 or 40 seconds.............NICE!
I repeated that cycle once more and found that I was losing heat and the melting process was slowing down so after yet another addition of scrap I put the furnace lid back on and got the air flowing again. Within a few minutes I had the temp back up and was melting scrap very easily again. I kept this cycle going until I had melted down an entire bag of crushed aluminum cans, which sounds like a lot of aluminum but there is also a lot of slag in the cans and my guess is that I got about a quart of aluminum melted from the one trash bag of cans, which I poured into a muffin tin to make ingots. It was only 12 degrees or so outside and by the time I poured the last of the crucible I was losing the heat in the metal. My hope is that I am cleaning up the scrap in making the ingots so that when I melt them again to pour a project I won't have so much slag to deal with.
After melting the bag of aluminum cans I decided to see how tin cans would melt, so I added charcoal to the furnace and got the heat up again. I loaded the crucible with tin cans and checked on them after 20 minutes or so in the furnace. They were glowing but no where near melting so I opened up the air and gave it a good blast, which in very short time only succeeded in blowing a hole in my crucible! In adding that much air I oxidized the mixture and killed my crucible. Kind of impressive for a charcoal powered furnace, but not what I was looking for!
So now I will have to wait for the weather to warm up and make another crucible before I can resume converting my scrap into ingots........................ I wonder what I would get if I added some tin cans to the melted aluminum.............Hmmmmmmmmm
until next spring then!
Subscribe to:
Posts (Atom)
