Well I didn't get any photos but I did get around to melting some more scrap aluminum. During my first melting session I noted that due to the size of the furnace I had made that it was evident that I needed more heat to get things moving along so I made that adjustment this time around. I started out with a good solid layer of charcoal on the bottom of the furnace four deep and got that burning. While that was getting started, I got some additional charcoal started in my fire pit and set the crucible into place in the furnace to start pre-heating the crucible. Once all of the charcoal was going good I added charcoal around the sides of the crucible about two-thirds of the way up. As soon as I accomplished that task I added scrap to the crucible, set the lid in place and got my air flowing into the furnace.
I checked on the progress after about 20 minutes and found a nice pool of molten aluminum in the bottom of the crucible! At that point I turned off the air, removed the furnace lid and spooned off the slag then added more scrap. Filling the crucible with a bunch of crushed cans the first thing I noticed was that the cans caught fire and melted within no more than 30 or 40 seconds.............NICE!
I repeated that cycle once more and found that I was losing heat and the melting process was slowing down so after yet another addition of scrap I put the furnace lid back on and got the air flowing again. Within a few minutes I had the temp back up and was melting scrap very easily again. I kept this cycle going until I had melted down an entire bag of crushed aluminum cans, which sounds like a lot of aluminum but there is also a lot of slag in the cans and my guess is that I got about a quart of aluminum melted from the one trash bag of cans, which I poured into a muffin tin to make ingots. It was only 12 degrees or so outside and by the time I poured the last of the crucible I was losing the heat in the metal. My hope is that I am cleaning up the scrap in making the ingots so that when I melt them again to pour a project I won't have so much slag to deal with.
After melting the bag of aluminum cans I decided to see how tin cans would melt, so I added charcoal to the furnace and got the heat up again. I loaded the crucible with tin cans and checked on them after 20 minutes or so in the furnace. They were glowing but no where near melting so I opened up the air and gave it a good blast, which in very short time only succeeded in blowing a hole in my crucible! In adding that much air I oxidized the mixture and killed my crucible. Kind of impressive for a charcoal powered furnace, but not what I was looking for!
So now I will have to wait for the weather to warm up and make another crucible before I can resume converting my scrap into ingots........................ I wonder what I would get if I added some tin cans to the melted aluminum.............Hmmmmmmmmm
until next spring then!
Tuesday, December 15, 2009
Sunday, November 22, 2009
First Melt
The time has finally come to see if my furnace will melt anything. Gingery's book calls for a double layer of charcoal on the bottom to get started and add to it as needed to maintain heat. I will start with that but I am doubtful that I will get enough heat going to melt anything with just a double layer on the bottom. I built my furnace twice as large as the furnace described in Gingery's book so my guess is that it will take quite a bit more than that. Keeping that in mind I have also decided to try melting some aluminum scrap first beacause of the lower temperature requirements to melt aluminum.


Here is the furnace layout all ready to get started.
To get the furnace ready I added a triple layer of charcoal on the bottom of the furnace and let them burn until they had all turned white. Just as you would to get a grill ready to cook on. Once those were going I set the crucible on top of the coals and added some additional charcoal along the sides of the crucible. Then I added several crushed aluminum cans to the crucible, turned on my shop vac, adjusted the flow down low and put the lid on the furnace That is when the waiting game started. After 20 minutes I noticed that the bottom of the crucible was glowing a dull red but after poking around on top of the cans it didn't appear that they were beginning to melt.It also appeared that most of the charcoal on the bottom had been used up so I lifted the crucible out of the furnace and added more charcoal and put the crucible back in place. I put the lid back and placed a small brick made out of leftover refractory mix on top of the vent hole. I didn't completely cover the vent, maybe about 90%. After it appeared that the new coals were going I increased the air flow a little bit in an attempt to bump the temperature up inside the furnace. That seemed to work and I finally noticed the aluminum starting to melt in the crucible, which was surprisingly exciting to see. It may have taken about 30 minutes longer than I had expected but it was working! Once the melting got started it seemed to melt all of the cans that I had placed into the crucible quite quickly so I removed the lid, skimmed off the slag, added more cans and closed the furnace up again. Once again the cans melted quite quickly and I also discovered something new. Aluminum cans leave have a LOT of impurities to remove as they melt. I was unsure of how much slag to expect and what it would look like etc. but once I saw it, it was obvious. So after reloading the crucible three times and skimming the slag I stirred the aluminum up to try to get a feel for it's consistency.


Here is a little tool that I made to skim slag from the melt. I also used it to stir the melt. It worked but I do think that I will buy a carbon rod to use for stirring.
Ultimately I finished up the night getting three melts in. I had stolen on of my wife's muffin pans to make ingots which seemed to work quite well for aluminum and I think the ingots gave me a good head start on removing the impurities of the cans. I hope that the various other non-can scrap that I have will not create so much slag.
Thursday, November 19, 2009
Crucible Modification
Seeing a problem with my design I realized that I needed to rethink my method of pouring. As you can see from what I came up with the first time around, aside from wishing I had noticed the upcoming issue before I completed all of the work, I knew that I had to figure out how to come up with a method of poring that maintained stability of the crucible as it was set aside after removal from the furnace while I attached a handle to the bottom of the crucible. The original design gave good control of the crucible while being poured but had lousy stability for the crucible while setting. Plus it was not the best or safest stab ility while installing the handle.


Notice how the assembly sits. Not stable at all.

The first thing I did was to trim the posts that I had extending from the lower corners. Then I added the posts shown above. I really only need to have one of the posts but I figured, while I am at it, put two on, one on each opposite corner so that I might have quicker access to hooking up the pouring handle. As I only used re-bar for the posts and had just cut through the re-bar a little over 3/4 of the way through to bend the re-bar, I welded the posts at the bent corner to add some material and strengthen the posts.
My next step was to redesign the handle itself because the change in post position changed the angles I needed to have at the pouring handle. Here is what I came up with:


An easy fix! I just cut the re-bar at the base of the plate, bent it to the angle I needed and welded it up to add some strength.
Monday, November 16, 2009
Crucible
Finally getting back to work on my furnace project it is time to produce some sort of Crucible so that I can get started melting some metal! Winter will be setting in here in Montan and I am quickly running out of time. The items I need to finish up as quickly as I can are: a crucible, some lifting tongs, something to allow me to pour the metal from the crucible. I figure I will make a crucible first and then figure out the other items as I go along.
Here is my initial design for a crucible:


Next item I needed to come up with was something to lift the crucible. I wanted something that would give me a very positive grip on the crucible and since I am not going to be using a standard shaped crucible I had to rethink


Here is my initial design for a crucible:


I found this 4.5 inch square tubing in the scrap pile at the local metal supply shop. It has 3/16 wall thickness so it should be reasonably durable for melting aluminum and pot metal. I also found a 3/16 thick piece of cold rolled flat that fit the width of the tube very nicely so I was able to get a nice bottom plate welded onto the tube. I cheated and strayed from my practice to date of trying to use only basic tools such as power drill. I used a power hack saw to cut the tube and the bottom plate. There was no way I wanted to cut those pieces by hand using a hand hack saw! I have a buddy that has restored an old power hack saw. It is a piece of history. Over 100 years old and he has restored it to near showroom condition. He was kind enough to offer it's use up to me and saved me a ton of work.

Here is the bottom. My idea is to use the longer corners as a point to hook onto to help with pouring the metal from the crucible. I have since rethought this approach.


This should give me a positive grip on the crucible. Just spread the lifting tong a bit and slip over the posts welded onto the crucible. These holes are 1/16 oversize so they should fit easily enough.

Nice fit!


The next item I need is something to help control the crucible while pouring. The crucible that I have made will hold well over 1 quart of aluminum. That could be a handful to try to rotate to pour being so heavy. My thought is that controlling each end and just having to lift instead of rotating would be easier as well as safer. The above handle would be used to grab onto the lower post welded to the crucible after the crucible has been removed from the furnace using the lifting tongs.

I saw a problem with my design right after I made this piece.
Saturday, October 17, 2009
Air flow metering valve test parts
After getting caught up on some work around the house I finally got to getting some work done on the furnace. I made up test parts for my idea about varying the air flow my furnace is getting from a shop vac. I could just buy a cheap hair dryer and be done with it, but I already have the shop vac.
I took the pipe that fits into the tuyere and added a small stop so that it would slide in but not protrude all the way into the furnace. Then I cut an opening into the pipe, made a small sheet metal finger that would fit into the opening in the pipe, obstructing a lot of the airflow up and out before it gets to the furnace. It seems to work so far. So far I have only roughed this together. After testing during a firing of the furnace I will clean up the design and construction, if it works as I expect it to.
Here is what I have done so far:


Wednesday, October 14, 2009
Air flow
After spending my 14 days at work I arrived home to a small amount of snow on the ground, which was a bit of a drag since October had just arrived a few days ago. That's a month or so early. Plus it was cold (3 deg. F) which is an even bigger problem as I want to try to start making some ingots while I am home.
I have been thinking of a way to cut down on the airflow I get from using my Shop-Vac as an air supply to my furnace. Since I can't easily reduce the output at the Shop-Vac, the flow needs to be reduced at some point along the connection to the furnace. So what I have come up with is cutting an opening in the supply pipe that slips into the tuyere, as well as fabricating a deflection valve to divert a portion of the air flow up and out of the opening. Since I am trying to use only some basic tools, cutting the opening will take a bit of time. I will put a picture of the modification out when I get the opening cut and the deflection valve fit. Then it will be time to try melting some of my scar pile and making some ingots! If the weather cooperates.
I have been thinking of a way to cut down on the airflow I get from using my Shop-Vac as an air supply to my furnace. Since I can't easily reduce the output at the Shop-Vac, the flow needs to be reduced at some point along the connection to the furnace. So what I have come up with is cutting an opening in the supply pipe that slips into the tuyere, as well as fabricating a deflection valve to divert a portion of the air flow up and out of the opening. Since I am trying to use only some basic tools, cutting the opening will take a bit of time. I will put a picture of the modification out when I get the opening cut and the deflection valve fit. Then it will be time to try melting some of my scar pile and making some ingots! If the weather cooperates.
Sunday, October 4, 2009
Cope and Drag
Another part that I have been working on is the Cope and Drag, the upper and lower halves of the box in which the mold is made. Gingery's book calls for a few different sizes and so far, I have only gotten around to making the 12"x12". I used clear pine to construct this first one which should be keep it sturdy enough to get the job done. With the Cope making up one half and the Drag making up the other half, they are simply for sided boxes that have no top or bottom and have some way of matching the two halves together, a registration method of some sort to allow the mold to be split and put back together again so that the halves will still line up. For this size I made each half as des cribed in the book. Here is what I came up with:


Stacked on top of each other. You can see how they will fit together.
Thursday, October 1, 2009
Sand Box
This is a bit out of order but as I was getting the furnace ready to go I started building some of the other items that I will need to have on order to cast metal. For the most part all of the support items needed are very simple to make there are just a lot of them and it can take some time. As with most of the items mentioned in Dave Gingery's book adapt them as you need according to what you have on hand.
The first two pieces that I made were very simple to make, the molding box for the green sand and a sliding saddle so that I would have a place on which to work. I made the box out of 2x8 pine with a plywood bottom and the saddle was made using 2x4 pine.

The first two pieces that I made were very simple to make, the molding box for the green sand and a sliding saddle so that I would have a place on which to work. I made the box out of 2x8 pine with a plywood bottom and the saddle was made using 2x4 pine.

Wednesday, September 30, 2009
A word of caution!
I missed something that I consider very important earlier on that goes back to mixing the refractory.
**When handling SILICA SAND, make SURE that you take care to avoid breathing any of the dust!!!**
It is not the healthiest of materials to be around and can cause severe health problems. I used a respirator when I was mixing up the refractory.

**When handling SILICA SAND, make SURE that you take care to avoid breathing any of the dust!!!**
It is not the healthiest of materials to be around and can cause severe health problems. I used a respirator when I was mixing up the refractory.

Curing
After getting the refractory liner in the furnace I left the furnace covered for several days. From what I have read this is ok to do, even possibly advantageous to do, as long as the refractory is not allowed to dry out. I had no issues when I finally got around to curing the refractory liner. Now, this is where having the lid ready to go is necessary because it is required to complete the curing, in fact when I made the lid I also took some of the extra refractory and made up several small bricks with the left over material and cured them at the same time by simply placing them among the coal of the fire for the duration of the lid curing process.
Curing the furnace is straight forward enough. I started with a double layer of charcoal, soaked in lighter fluid and got them fired up. I used this lower temperature heat to drive moisture out of the liner slowly and it also burned the cardboard inner form out as well.


Curing the furnace is straight forward enough. I started with a double layer of charcoal, soaked in lighter fluid and got them fired up. I used this lower temperature heat to drive moisture out of the liner slowly and it also burned the cardboard inner form out as well.

After getting the first double layer of charcoal going good and burning out the inner form I added another double layer of charcoal and got that going strong. I kept adding charcoal layers as the last layer of charcoal was burning good until I had about 2/3's of the furnace filled with lit charcoal. Then I put the lid in place and started adding air through the tuyrere.

I used my shop-vac as an air source, which was a bit too much air. To solve this I am working on a valve system to allow a variable, more controllable flow rate. But as you can see, it worked great for the curing process.
I kept this up all through the burning of the first load of charcoal and when that had burnt down to a few inches left I added to the charcoal again to a load of about half full and kept the air going.

Use caution! As you can see the furnace will send out some embers, especially with a fresh load of charcoal (note how I have backed the air supply away from the tuyere to limit airflow)

I was surprised at how hot things actually got inside the furnace!
Tuesday, September 29, 2009
The furnace
After getting all of the various components in place and the refractory mixed I began to fill the furnace using a small garden shovel. As I would shovel in an inch or so of refractory I would stop and take the time to tamp the mixture into place, trying to make sure that all voids were filled. After I had gotten about half-way up the inner liner I pulled the alignment spacers hoping that the weight of the refractory packed in place to that point would keep everything in place. That seemed to work fairly well and I didn't notice any shifting around.
After getting the furnace all filled, I troweled the top smooth, covered the furnace with plastic and set it aside with plans to cure the liner within a few days.

After getting the furnace all filled, I troweled the top smooth, covered the furnace with plastic and set it aside with plans to cure the liner within a few days.

Almost forgot!
I almost forgot a step in getting the furnace ready for use. It requires an air source of some sort to be able to crank up the heat necessary to melt metal. The temperature required to melt aluminum and tin or pot metal is relatively low so it shouldn't take much air to do the job. Gingery's book mentions a few methods one of which is to use a hair dryer. Being that I have plans to build a different furnace capable of melting cast iron I decided to try out a larger air source and design a method of controlling how much air is sent to the furnace. Either way a method of connecting an air source is needed and that is where the tuyere comes in. For the furnace this means that a pipe is added through one side of the furnace and into the inner chamber. The pipe will accept a slightly smaller pipe that will be inserted into the tuyere to provide the air. Dave's book calls for a 1 inch diameter thin wall pipe that can be split and opened up a bit to accept a length of the same 1 inch diameter pipe. I bought a few feet each of a thicker walled 1-1/4 o.d pipe and another piece of pipe that was roughly 1-3/8 i.d not perfect but more than adequate.

I located the tuyere roughly 3 inches on center from the bottom to allow for a decent depth of refractory to line the bottom of the can.
Refractory Mix
Again, using a mix of 2 parts silica sand, 1 part fire clay and a minimal amount of water the furnace is ready to fill.


Monday, September 28, 2009

Setting the liner
Inner Liner
Here is the liner setting inside the can:


It's not a perfect circle, but who cares? that doesn't matter. The liner also sits a few inches below the rim of the can and will be lifted up level with the top so that a base can be formed.
Sunday, September 27, 2009
Furnace Prep

Curing The Lid
After getting the refractory into the lid it still needs to be cured. Gingery's book calls for a pattern of temperatures and time to be completed in an oven. The lid I built, with the handles as I built them, wouldn't even come close to fitting in my oven, plus my wife wouldn't have liked me doing that anyway, so I just built a fire in my fire pit and cure the lid slowly that way.


I started with a small fire and stood the lid on it's side along an edge of the fire pit. After a bit of steam had stopped coming from the first side I turned the lid around to expose the other side to the low heat and after that, I built the fire up and tried to put as much heat as I could into the lid. It seemed to work, notice the crack running from the bottom of the lid towards the center. It actually shows up well in the photo, it was actually a very small crack, which I filled in later with a bit of refractory that I thinned out a bit to get it into the crack better.
I finished the off by covering it with the coals and letting the lid cool slowly as the fire and coals burnt out.
The Lid
After mixing I just packed the refractory into the lid, doing my best to make sure I got the mix through all the wires and then troweled top and bottom to get both surfaces as smooth as possible.


Refractory Mix

Saturday, September 26, 2009
Furnace Lid
To convert the 10 gallon can into a working furnace I needed to line it with a refractory mix to be able to withstand the heat required to melt the metal. There are very good, higher temperature resistant refractory mixes available (at a cost), but the Gingery furnace is intended for the lower temperature requirements of melting scrap aluminum and tin so I decided to stick to the book and line my furnace with the mix he describes in his book. It is very economical and easy to make. The recipe calls for a mix of 2 parts silica sand and 1 part fire clay, both of which are readily available and inexpensive. I have read about a few other recipes based on this basic mix, but I decided to stick to what Gingery calls for.
The mix is simple enough and I thoroughly mixed the two ingredients together dry before I began adding water. Once I started adding water, I added it slowly with a garden type sprinkle can to try to avoid separating the sand from the clay. The process of using the refractory requires a curing process so the first item I made was the lid for the furnace.
The lid was straight forward enough. I measured the circumference of the lid, added 2 inches to the resulting diameter and cut a piece of 2 inch wide sheet metal long enough to produce that circumference plus a few inches so that I could rivet it together, not a very critical measurement is needed. Then, needing a handle of some sort to be able to move the lid around I split from the book design. The book calls for drilling some holes around the perimeter of the lid and adding some wire framework to the inside of the lid to help add some structure to the refractory as the lid had no top or bottom structure of it's own. The handle made in the book calls for the handles to made of this wire. I had some 3/8 inc re-bar laying around so I made a rectangular handle and then added some wire for some additional structure as well as using it to hold a 3 inch diameter can in the center, which will form a vent hole in the lid. Here is what I came up with:

The can is close to the center but not perfect by any means and the wire I used was just some wire I had left over from another project, I was going to use .032 safety wire until I found this stuff which is a bit heavier. I think it was used to hang picture frames, etc.
Friday, September 25, 2009
Getting Started
Hi!
My name is Mike. I am a helicopter pilot currently, but many years ago I was a machinist/toolmaker. A while back I ran across an ad for Dave Gingery's series of books on building a machine shop from scratch and it sounded like fun so a few years ago I bought the books and I have finally gotten around to getting started. I work away from home and that can make it tough to keep momentum going on projects but as I have finally gotten going on building the furnace I am hopeful that I can keep it going. Living in Montana and with winter approaching I may not be able to get much metal cast for a few more months but there are PLENTY of things I can continue work on through the snowy winter.


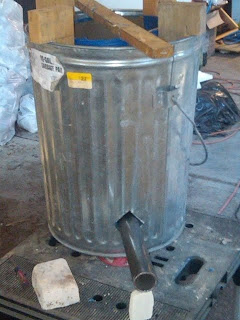
In case you don't know about the Gingery Projects, it all starts with building a charcoal powered furnace that can reach temperatures capable of melting scrap aluminum and pot metal (tin) which can then be sand cast to make the parts that can be assembled into various machine tools. The books detail plans to build several bench top machine beginning with a lathe and using that tool to build other tools such as a mill, a shaper etc. all using old methods.
The above trash can will be used to build my furnace. The book calls for using a 5 gallon metal pail. I am using a 10 gallon trash can so that I can get a bit more capacity.
Over the next few days I will cover what I have done so far and then I will try to carry on and keep things updated as I continue my progress!
Subscribe to:
Comments (Atom)
